

Canva is one of the most popular online applications for designing images and products that require the creative touch, rivaling the likes of Adobe Photoshop in recent years thanks to its popularity, feature set, and ease of use.
One of the most powerful features of Canva is the Magic Design tool, which is used to create custom designs for your business or personal use, such as for the creation of unique greeting cards. Magic Design can be used to develop products for almost any purpose, including for greeting and special occasion cards.
If we can learn the Magic Design tool, we have the potential to streamline many creative workflows. It’s not just a tool for creating art and images but for taking those images and making something truly special from them, like a birthday card for your next of kin.
So What Is Magic Design in Canva?
Magic Design is a workflow that uses both ai and an extensive library of templates and structures to make it easy for you to create anything that you need.
It can be used to simplify the design process and offers a wide range of customizable templates, fonts, and graphics that can be tailored to your specific project.
With Magic Design, you can create a greeting card using a handy template or even with your own image, thanks to the use of artificial intelligence. Magic design aims to define your template based on a wide selection of categories and filters to end up with something perfect for you.
For example, you could use Canva Magic Design to generate ideas for a Christmas card, celebrate a special achievement with them, or wish them a happy birthday.
You can take things to the next level of creativity by using Ai, where you can upload your images using the Ai functionality of Magic Design, and then Canva will create templates based on your uploaded image.
Now let us go through the steps required to create greetings cards using Canva.
We can take three pathways to create our greeting cards in Canva. The first is the manual way, where we start from nothing using a blank canvas.
The second uses Magic Design to create the perfect template we can edit as much as we need for our ideal greetings card by combining different filters.
The third method is similar to the second, but we use Magic Design to upload our own image rather than just relying on Canva, which will generate templates based on that image.
For most users, the second workflow would be ideal for saving time and potentially getting a better result if you are not a pro at using design tools. The first is for those looking for complete control over the entire process and want to start from scratch. The third workflow is perfect for those who have already created the main image and want Canva to format a new design.
Workflow 1 – The Manual Way
- Sign Up Or Log In To Canva
- Create Your Design
- Create Your Logo From Scratch
- Download Your Card
Workflow 2 – The Canva Way
- Sign Up Or Log In To Canva
- Access The Templates
- Choose Your Template With Ai Filters
- Edit Your Template
- Download Your Card
Workflow 3 – The Magic Way
- Sign Up Or Log In To Canva
- Access The Magic Design Feature In Templates
- Upload Your Image Using Magic Design
- Choose Your Template
- Edit Your Greeting Card
- Download The Card
While the first workflow has the fewest number of steps total, it is the longest as it requires you to spend way longer in Canva creating your card from scratch.
With the second workflow, we spend a little bit of time locating the ideal template for our card, but this significantly reduces the amount of time needed to edit the design on our canvas.
As for the third workflow, it has more steps, but using your own design to generate the template is faster than searching for a template from the canvas library. It also further reduces the editing time in most cases.
Therefore, the third workflow is potentially the fastest and most efficient.
Workflow 1 – The Manual Way
Sign Up Or Log In To Canva
Visit the Canva website at www.canva.com and sign up for a free account if you don’t already have one. If you’re already a registered user, log in with your credentials.
It is required to have at least a free account to use Canva, and the vast majority of features available in Canva are a part of the free account option.
However, many elements and templates, as well as more advanced tools like artificial intelligence tools and the Magic Design Ai tool, will only be available if you were to subscribe to the pro account of Canva, which can be simply by going to billing and plans over in your account section and upgrading your plan.
Additional features like the ability to create transparency and the resize canvas tools are extremely useful, and require a canvas pro subscription.
Create A Blank Canvas
On the homepage, click the ‘Create a design’ button, and then type in greeting in the prompt box. Choose ‘Greeting Card’ from the list of options. This will take you to the canvas page in a new window, where you can access the tools required to create your greetings card and other designs.
Also note that you can be more specific when accessing the suggestions from the Create My Design Option’. If you type in birthday, you will get a variety of different suggestions for birthday themed designs.
The same is true if you were to use prompt phrases like Wedding, Christmas, Or Anniversary. So if you are creating something for a specific occasion, try that prompt in the text box.
Create Your Card From Scratch
By accessing the design page in this way, we start with a blank canvas. We can add colors, text, and elements if we want 100% control over the appearance of our card. This is the preferred choice for those confident in their design skills and willing to start from blank.
In the side panel, we can access all the tools required to add various elements to our blank canvas. For example, we could go to the Elements tab and begin adding things like images, graphics, and text to our canvas to begin designing the card.
Let’s create something simple as an example. We can change the background color first by selecting the color icon in the header, which opens up an additional menu to the side. Then we can choose the color we want to use, such as a light pinkish color.
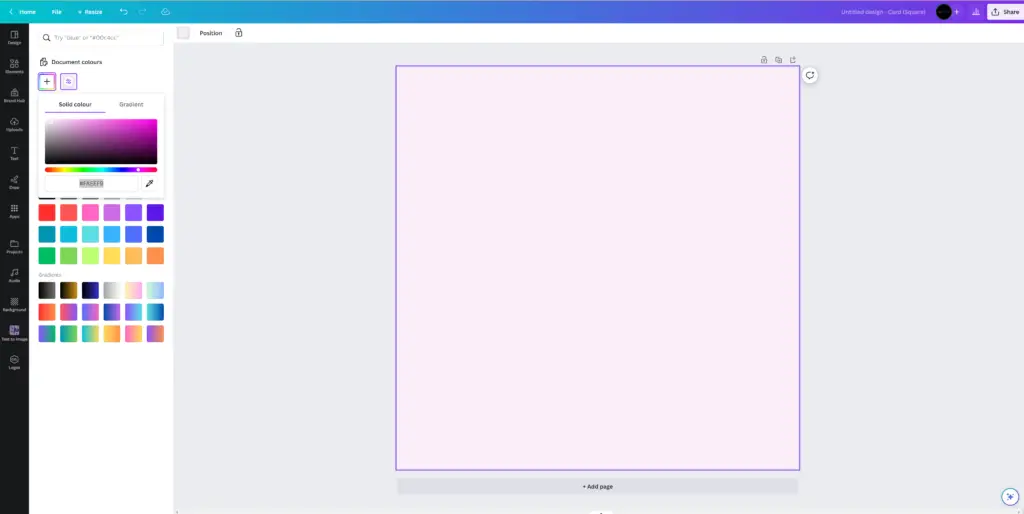
Then we can return to the elements tab in the side panel and type in birthday, and canva will give us a library of graphics relating to the keyword.
We can choose a couple and then position them into our canvas. All elements can be selected independently and adjusted both in terms of size and position.
Canva uses a layering system, so you have a graphic in front when you actually want to move it behind another graphic by right clicking to open the context menu, Then from this menu select layering and send the item backwards so that it appears behind the other graphics.
We can add a little bit of text as well, and with this text, we can edit things like the sizing, the actual font of the text, and even its ability to curve.
The number of ways in which we can edit our designs are numerous, and in our example, after just a couple of minutes of picking out elements and editing them, we end up with this for our birthday card.

Overall, this doesn’t appear to be too bad for the cover of our birthday card and is most certainly usable. By exploiting the layer system alongside the ability to import a wide variety of graphics and text based elements, we have the ability to create almost anything that we want.
Download your Design
To download your design it just go up to the top corner and click on the share button which will open up a menu. Then select the download option.
From this menu, you will be able to determine the resolution of your image as well as the file type that you wish to export it as. It will typically be set on PNG, which is the recommended format for both quality and size.
If you are willing to sacrifice on a little bit of clarity in your design, you can switch it up to a JPEG to save space on your computer.
Click the Download button to begin the process and then you should have a version of your design on your computer.
Workflow 2 – The Canva Way
Sign Up Or Log In To Canva
Visit the Canva website at www.canva.com and sign up for a free account if you don’t already have one. If you’re already a registered user, log in with your credentials.
You are required to have at least a free account to use Canva, and the vast majority of features that are available in Canva are a part of the free account option.
However, note that many elements and templates, as well as more advanced tools like ai tools and the Magic Design tool, will only be available if you were to subscribe to the pro account of Canva, which can be simply by going to billing and plans over in your account section and upgrading your plan.
If using this workflow, it is highly recommended that you have a subscription to Canva Pro to gain full access to the features of Magic Design, but not strictly required.
This step will remain the same regardless of your chosen workflow since you can only ever start any workflow in Canva by logging in.
Access The Templates Section
If you want to use the Magic Design features, you must make your way to the templates or access using the appropriate URL. If you go to https://www.canva.com/magic-design/, it will take you to a page with a purple button labeled ‘Try Magic Design.’ Click to access the templates and the magic design feature.
On the other hand, you can go to the home page of the Canva website, go to the side panel, and then select the all templates option. Then when you see your templates click the Try Magic Design Button that appears towards the top.
Input Design Preferences
In this template menu, you can use several tools to define precisely what you want to use as the base of your design. In our case, we want to create a greeting card.
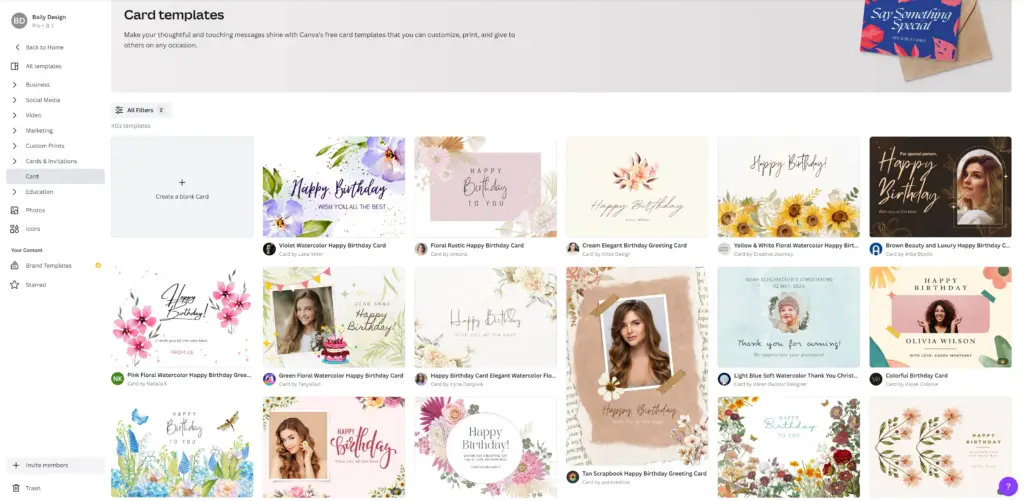
In Canva, Cards are defined as categories for our templates, so we will need to access the categories menu towards the top.
The Card template can be located in the cards and invitations section in the category menu. Left-click on the option and the templates will switch out to show cards exclusively.
The templates directly below will now only show card formats, so you could just choose one of these formats and move on. However, there is a way to narrow down our options even further for more specific results. This can be done by adding filters.
Next to the categories menu, we have a button labeled All Filters. If we left-click on this button, a secondary side panel will open up to replace the original. From here, there are a variety of different categories which allow us to alter the templates that are visible to us.
The first category, for example, is for the format. This is going to change the canvas size when we choose our templates. Many of the templates themselves will follow a specific canvas size. Therefore, choosing one of the formats will reduce the number of templates available.
The rest of this side panel is broken down into the following:
- Format
- Style
- Theme
- Feature
- Grade
- Subject
- Topic
This will allow you to define characteristics to suit your car. You don’t have to filter on all of these categories. And if you were to take too many boxes then you would end up with no templates whatsoever. So just take a couple of minutes to familiarise yourself with all of the options available.
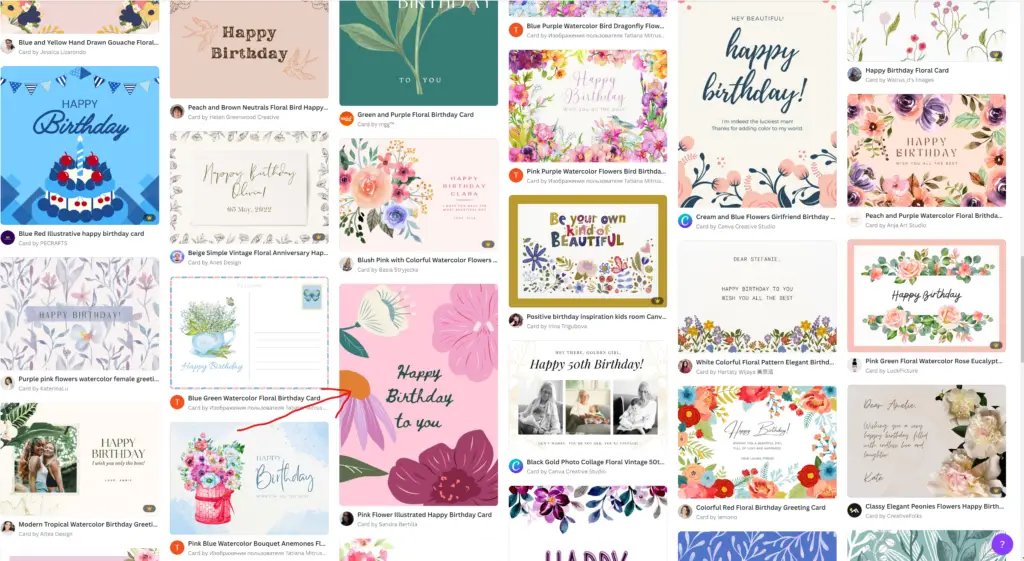
For our example, we will open up the style options and from the list choose floral. Then we will open up the theme and set this to birthday. We end up with these results in Canva.
The number of available options will be noted in parenthesis next to each parameter in the side menu and changes as more parameters are enabled, so keep that in mind.
By using these two filters, we limit the number of available templates to 403 different birthday cards that use a floral style. We could apply one or two more filters to shrink the field further, but let’s see if we can find a logo we like. As we scroll through our options, we come across a logo that we like the look of.
Choose A Logo Design
If you want to use a specific template as your card, left-click on it to bring up a window that has details on the template’s design.
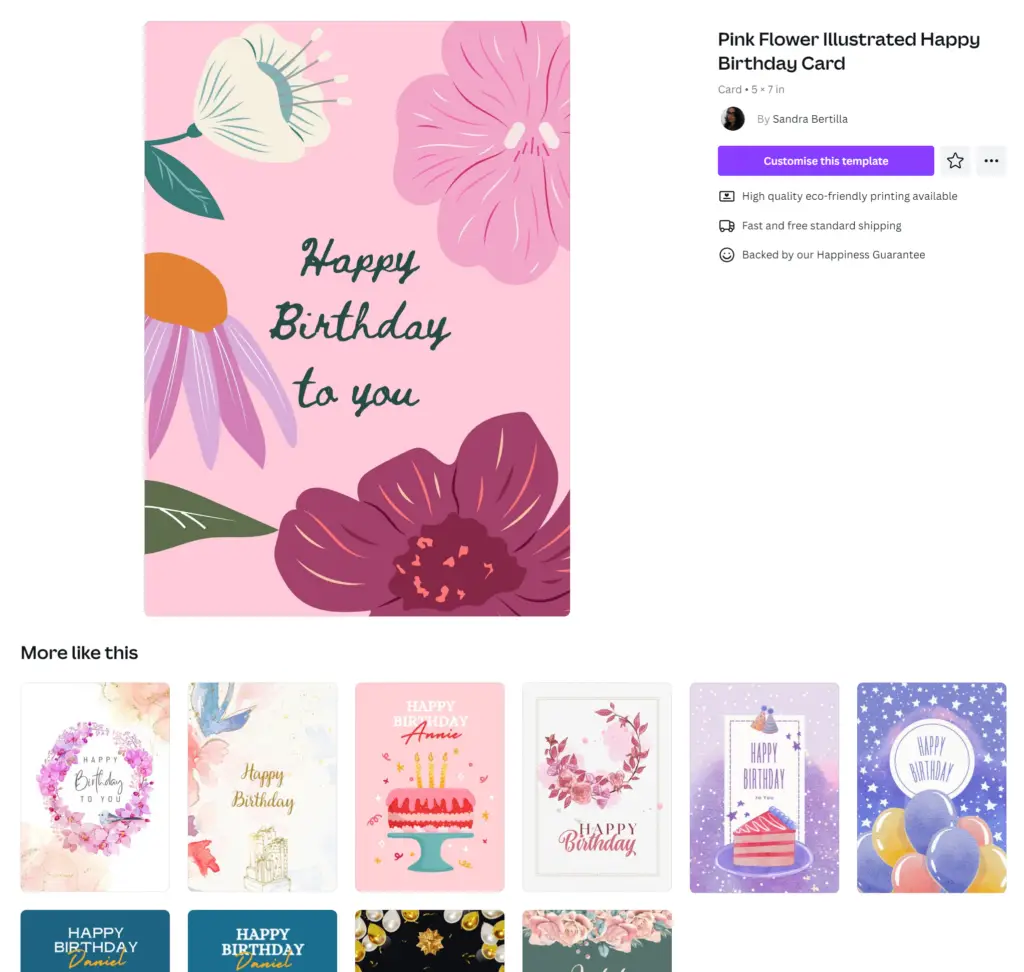
Many of the templates will, but look out for quotes like ‘100% customizable’ and ‘Share and publish anywhere’ so that you have complete control of the chosen template and how you want to use it.
Click on the option in the top corner labeled ‘Customize This Template,’ A new window will open in your browser, which takes you to the canvas page. This time, however, the chosen template will already be waiting for you to begin editing.

Instead of starting from scratch. This will allow you to start from your chosen template, and if the template itself is good enough, you might not even have to change anything.
Customize The Card
Despite the fact that we are using an entire template built in Canva, all of the elements that are associated with this template can be selected and edited. This means that we can adjust the position of each element.
We can also adjust their size and scale the text size and font in terms of the text elements and, in some cases, even the colors.
For example, I could select the background and change the color to more of a cream look. I can also change the text that’s written as well as the text font. I could perhaps even change the colors of some of the individual elements, resulting in a different look from the original templates.

It only took a minute or so to change our template. Yet we still have a viable result that is potentially better than when we created our card from scratch on a blank canvas.
But how about you judge that for yourself? Below we have images of both. Which one would you want as your birthday card?
Both are satisfactory results, even though neither took a significant amount of time and we can spend a lot more time with each design. However, more elements are used in the templates, and it’s already structured in a suitable way for our card. So there are certain things we can change and certain things we don’t need to.
I prefer the one that was generated from the template, and I know that if I want to edit further I can. It’s a lot easier to work off of a template than it is to start from scratch. For a lot of us who want to use Canva to design our greeting cards, templates are often the way to go.
Save And Download Your Card
Once you are happy with your design, click on the ‘Download’ button at the top right corner of the screen to save and download your design onto your computer. Canva offers multiple file formats, such as PNG, JPEG, and PDF. Choose the appropriate format for your needs and download your new logo.
Everything here is the same as the previous workflow, for cards we recommend exporting without any loss of quality, so choose the recommended PNG setting.
Workflow Three
Sign Up Or Log In To Canva
Visit the Canva website at www.canva.com and sign up for a free account if you don’t already have one. If you’re already a registered user, log in with your credentials.
If using this workflow, it is highly recommended that you have a subscription to Canva Pro to gain full access to the features of Magic Design, but not strictly required.
This step will remain the same regardless of your chosen workflow since you can only start any workflow in Canva by logging in.
Access The Template Section
This step is the same as it is for our previous workflow, as we first require access to our library of templates to use the ai tool for magic design.
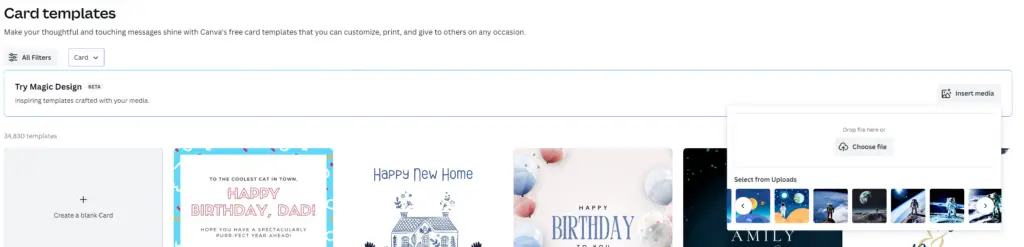
On the Canva home page, go to the side panel, and from here select templates. On the templates page we can see that there is an option to ‘Try Magic Design’ which we can do by clicking on the button.
This will now bring the category and all filter buttons into view, as well as an insert media button to the side.
Using Magic Design Ai To Generate Your Own Card
If you already have an image or photo that you wish to use as the basis for your card, you can use the magic design ai feature to upload your image, and then Canva will use its ai tool to generate a series of templates based on your uploaded photo.
Left click on the button labeled as Insert Menu to open a small window, from which you can upload an image to canva from your device or use existing images that you have already uploaded.
For our example, we are going to use a cartoony image of a man looking up at a planet. When we select it Canva will then generate some templates for us based on this image.
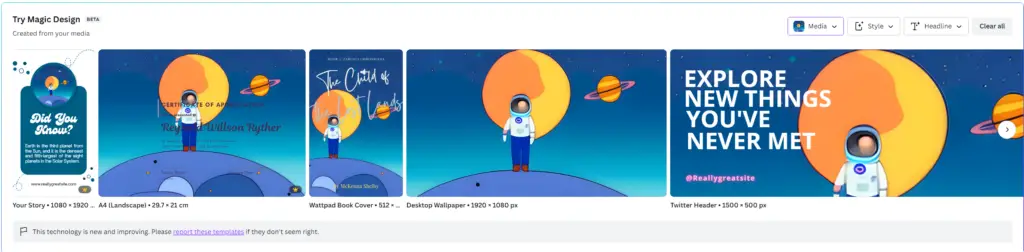
These templates are good but they are not specifically templates for cards. To fix this you can return to the category menu and choose card from the menu. This will only give us a few templates but they will be more accurate to what we want.
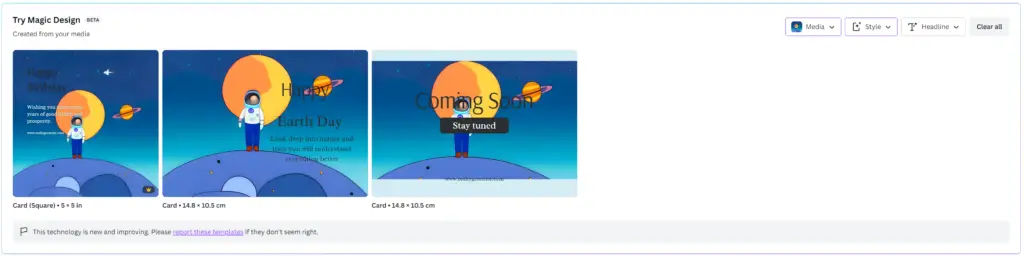
At this time, ai generated templates are not going to be perfect, so more editing may be required if you want to use your own images with this workflow compared to using Canva’s own library.
But at least we will have something to start with using our own material. We can further edit the results in the top corner of this section. We can change the base image by selecting the Media button. We can alter color mapping by changing the style, or we can add our own custom headline to the image.
Edit Your Ai Generated Card
Just follow the same steps for editing your logo in the canvas as you would when using the alternative workflow, then when you are happy with the result, move onto the download stage.
For us, we can select the first option which uses a 5 x 5 inch card format, and then choose the option to customize the template.
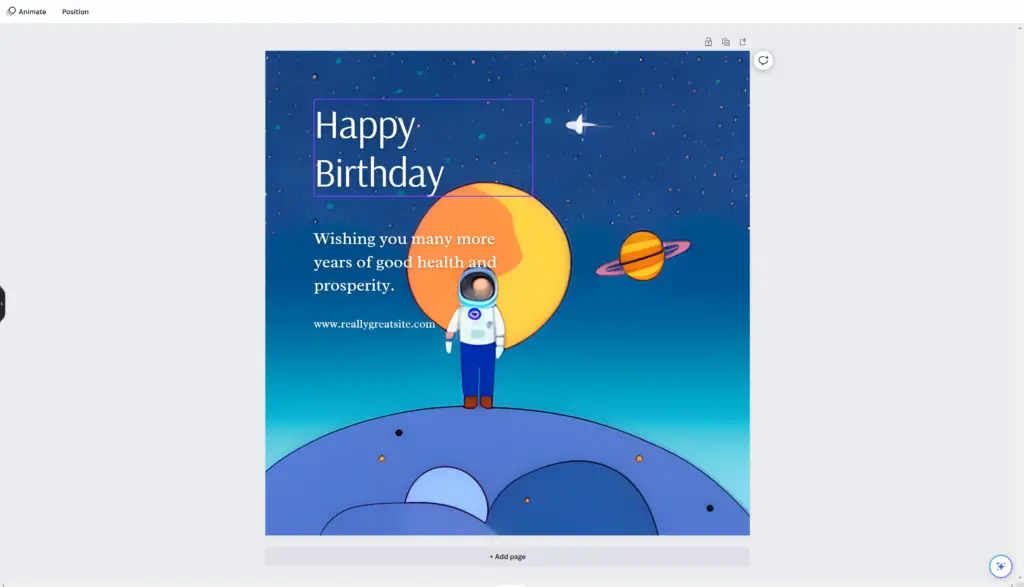
I might make a couple of changes using the template. the extra text is unneeded, so we can get rid of that. And a card like this might look better if we had Happy Birthday orbiting around it like a ring.
You can delete any element just by clicking it and then pressing the delete key. As for the Happy Birthday, we can reposition it above the planet, and then using the effects menu we can adjust the curvature of the text to better match the planet’s shape.

Save And Download Your Logo
After customizing your card, click on the ‘Download’ button at the top right corner of the screen to save your design. Canva offers multiple file formats, such as PNG, JPEG, and PDF. Choose the appropriate format for your needs and download your new logo.
You can now use the cover as part of a print for your birthday card, one unlike any other.
Creating a Greetings card with Magic Design in Canva is an enjoyable process, even for those without any design experience.
By harnessing the power of AI, Canva’s Magic Design tool helps you generate unique and professional logos tailored to your brand. With this step-by-step guide, you’re now ready to create an eye-catching logo for your business or personal project.